- Introduction
- Installation
- Before you start
- Step 1 – Get the ESP32
- Step 2 – Connect it to your computer
- Step 3 – Create the Bluetooth Proxy
- Step 4 – Add the ‘ESP32 Bluetooth Proxy’ to Home Assistant
- Step 5 – Install ‘Diesel Heater’ Integration
- Step 6 – Add the Diesel Heater to Home Assistant!
- Step 7 – Create a Dashboard.
- Step 8 – Test it
- Final thoughts
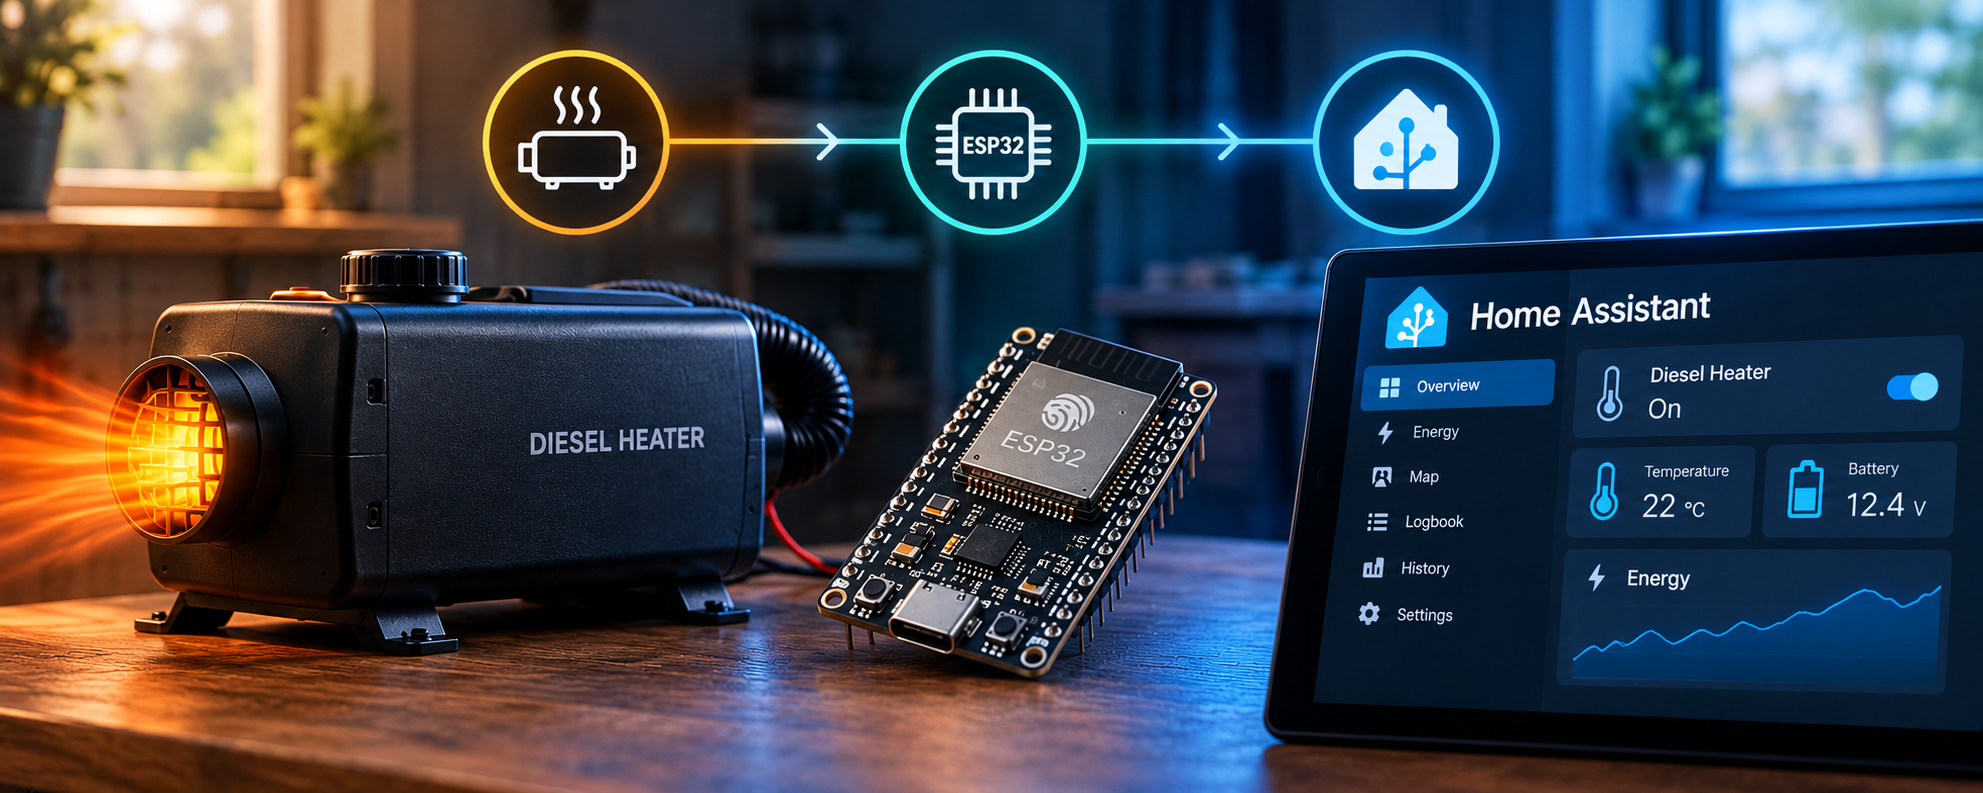
Yea. I used ChatGPT to make the header image.
Introduction
Ive had a Chinese Diesel Heater in my conservatory for a couple of years now and generally, I’m pretty pleased with it. Ive also recently been playing around with Home Assistant for various home automations / easy control of our air con. As autumn is setting in and I fired up the heater, it came to mind, could Home Assistant control the heater? And, as it turns out, it gives you quite a bit more control than the supplied controller.
You need;
- A diesel heater with bluetooth controller. (see ‘Diesel Heater Compatibility’ notes)
- Home Assistant (ideally running on a device with built in bluetooth)
- If no bluetooth, a bluetooth proxy by using an ESP32 module
- ‘Diesel Heater’ – Home Assistant Integration’ by Spettacolo83 (other software available but I’ve not used)
- Some time
Ive muddled my way through it with a combination of Google research / Chat GPT guidance – now I’m setup and fully functional.
Here’s my guide for what you need to know and how to.
Oh, check out this spare parts and accessories page too. And Chinese Diesel Heater Fuel Consumption & Cost Calculator. And Chinese Diesel Heating – For A Conservatory And 3d Print File – CDH Inlet 75mm Ducting Adaptor (5KW)
Why?
Chinese diesel heaters are broadly similar in how they operate, but there are many different controllers and communication protocols – giving various features. (or lack of)
My controller is this one;
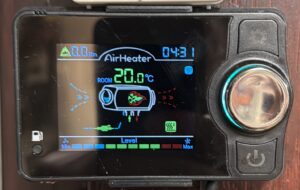
In my my instance, the controller the unit has lets me do the following:
- Either, control the ‘power level’ ie set fan speed between 1 – 10. Higher numbers mean faster fan and more diesel = hotter.
- Or, set a temperature in thermostat mode and the controller will adjust its level to achieve. Once set point reached, it can either continue to heat at slowest speed / heat or turn off untill 2 degrees under set point.
- Time display
- A schedule can be set to turn on, and the length of time its on for, from turn on time, scheduled
- Track fuel remaining (based on calculation of usage) (to suit 5L, 10L or 15L tanks only)
- Display additional information by holding the settings button (faults, temp of unit, voltage, altitude)
- Control via bluetooth on a pretty basic app
One issue with this unit its that it doesn’t keep the time well – making using the schedule pointless.
My second issue is that when in thermostat mode, it doesn’t ramp up the speed / heat to achieve the set point.
I find for example; I turn the unit on, set to full power to get the room heated up nicely, change to thermostat mode at 20 degrees. It goes into standby, 18 degrees comes along, it goes into glow plug on / warm up mode, by the time its pumping warm air out, its 17 degrees. Then it just casually plods along at a low speed / heat and never gets back to 20 degrees to turn off.
Perhaps this wouldn’t be such an issue if the room was more insulated.
I need more flexibility. That’s where the benefits of controlling the unit with Home Assistant comes in. From here on in, known as ‘HA’.
Oh and I want full (away from home) control from my phone as well!
Benefits
With Home Assistant we can create automations, for example;
- If room temp is less than 20 degrees, turn on unit in power level mode
- If room temp is more than 22 degrees, turn of unit
- Turn on the heater at 6AM, only if someone is home
- Turn off the heater at 11PM
- If fault, send notification to phone
- If fuel level low, set off whatever you like
- Run a burn-off cycle periodically.
- Synchronise the heater’s clock automatically.
- Don’t run it if a window or door is open
Those examples are at a basic level, you could build many if, buts and maybes into the automations.
We can also build our own custom dashboard within Home Assistant. Featuring mine below;
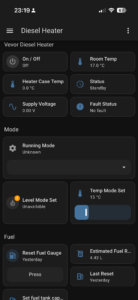
Another nice feature of the ‘Diesel Heater’ HA integration that Im using is that it essentially creates more features.
- Burn off mode – Run at max power to burn soot – adjust how often, how long, when etc (Burn-off has been verified only on heaters that use the AA55 encrypted protocol (AirHeaterBLE))
- Time Sync – Synchronize heater clock with Home Assistant
- Fuel Consumption Tracking – Local estimates for the established air-heater protocols. Hourly consumption rate (L/h) – real-time instantaneous rate. Daily consumption (L) – automatically resets at midnight. Total consumption (L) – lifetime tracking
Its ‘local’ – no data will leave your HA setup to the internet for it all to work. If you have remote access set up to HA, you can control it from anywhere.
Home Assistant (HA)
Ive mentioned it enough now, and if you already use Home Assistant – you know how powerful it is.
If you don’t; Home Assistant is an open-source home automation platform that brings all your smart devices and systems into one place. It lets you monitor, automate and control things around your home—often locally—regardless of which manufacturer or ecosystem they belong to.
For this application, you’ll want Home Assistant running permanently on a device within your home network. A few common ways to host Home Assistant are:
- Dedicated server – useful for larger or more complex smart-home installations.
- Dedicated Raspberry Pi – simple, low-power and popular for smaller setups.
- Mini PC / NUC – runs Home Assistant OS directly and gives you more performance.
- NAS – run it as a virtual machine (VM) or container alongside your other services.
- Virtual machine on a PC/server/NAS – Home Assistant OS runs inside something like Proxmox, VMware or Hyper-V.
- Docker container – lightweight, although some Home Assistant features are less straightforward than with Home Assistant OS.
There are many guides on how to get this up and running – it’s far beyond this guide.
ESP32 Module?
If the hardware that is hosting your HA setup has bluetooth BLE then it’s a ‘Tony – Grrreeat’ moment.

It’s worth noting (as many people use these to host HA) that certain devices such as the Raspberry Pi 4 with in built bluetooth is not reliable for BLE devices. It’s recommended to use an external USB Bluetooth 5.0 dongle.
Or, use a Bluetooth proxy. In my setup this is required because my NAS has no Bluetooth hardware and is hosting the virtual machine that runs Home Assistant.
Enter the ESP32 module – a small, inexpensive microcontroller board with built-in Wi-Fi and Bluetooth.
Think of it as a tiny computer you can program to read sensors, control relays/outputs, and communicate with pretty much anything. There are lots of versions (ESP32, ESP32-S3, ESP32-C3 etc.), with different numbers of pins, memory and features.
In this case we are going to use the ESP32 Module as bluetooth proxy so that Home Assistant can talk to the diesel heater.
The ESP32 isn’t actually controlling the heater itself. It acts as a Bluetooth bridge, allowing Home Assistant to communicate with the heater’s Bluetooth controller over your Wi-Fi network.
Think of it like this; Diesel Heater ↔ Bluetooth ↔ ESP32 ↔ Wi-Fi ↔ Home Assistant
Don’t back out now either is this really is simple to get running and you don’t need any programming experience.
Ive used a ESP32 WROOM – they are cheap making this very inexpensive to achieve. You do want a ‘DevKit’ version as this has a USB connection for power / programming and has reset buttons.
Important: The ESP32 will be permanently connected to your Wi-Fi and should be powered continuously. Don’t unplug it after installation — Home Assistant needs it available to communicate with the heater.
Before buying anything, check your heater is compatible with the integration.
Diesel Heater Compatibility
‘Diesel Heater’ – Home Assistant Integration’ by Spettacolo83 integration supports multiple protocols and has been tested with various diesel heaters:
The information below is taken from the integration’s documentation and may change as development continues. Time of writing Oct 2026. Check back to the project on GitHub for a current update – Diesel Heater’ – Home Assistant Integration’ by Spettacolo83
Supported Protocols
| Protocol | Completion | Apps | Notes |
|---|---|---|---|
| AA55 Unencrypted | 95% | AirHeaterBLE | Original Vevor protocol |
| AA55 Encrypted | 99% | AirHeaterBLE | XOR encrypted variant |
| AA66 Unencrypted | 95% | AirHeaterBLE | 20-byte variant |
| AA66 Encrypted | 95% | AirHeaterBLE | XOR encrypted, Fahrenheit internal |
| ABBA | 80% | AirHeaterCC | Different command structure |
| CBFF/FEAA | 60% | Sunster | Double XOR encryption variant |
| Hcalory MVP1/MVP2 | 95% | Hcalory | Hcalory controller variants, including HBU1S |
| HeatGenie / Boygu | 95% | Heat Genie | Register protocol with optional probes and component state bits |
| Webasto Cronus | 95% | ThermoConnect | Record protocol for air and water controllers |
ABBA, CBFF, and Hcalory protocols are used by various heater brands. If you own a heater that uses one of these protocols, please check the Issues, beta test, and report any problems.
Bluetooth Service UUIDs
- FFE0 Service:
0000ffe0-0000-1000-8000-00805f9b34fb(AA55/AA66 heaters) - FFF0 Service:
0000fff0-0000-1000-8000-00805f9b34fb(ABBA/HeaterCC, CBFF/Sunster, Hcalory MVP1) - BD39 Service:
0000bd39-0000-1000-8000-00805f9b34fb(Hcalory MVP2 heaters like HBU1S) - 181A Service:
0000181a-0000-1000-8000-00805f9b34fb(HeatGenie/Boygu; characteristic direction is verified after connecting) - Cronus characteristics: notify
4229d528-33d0-4aa7-9af1-00b03fc128f9, write2ed964d9-1371-45ee-a84b-1d134d5ce7b7
Tested Heaters
- Vevor Diesel Heater (various models)
- BYD Diesel Heaters
- HeaterCC compatible heaters
- Sunster TB10Pro WiFi
- Hcalory HBU1S and similar models
- HeatGenie/Boygu controllers
- Webasto ThermoConnect Cronus Smart controllers
- Generic heaters whose BLE transport and status protocol match a supported family
Installation
Before you start
This guide assumes you already have a working Home Assistant OS installation and a diesel heater with a compatible Bluetooth controller.
You don’t need any programming experience to follow this guide. There are a few technical terms involved, but I’ll explain them as we go.
My setup uses Home Assistant running as a virtual machine on a NAS, with an ESP32 acting as a Bluetooth proxy. Your setup may be slightly different, but the principle is the same.
If your device hosting Home Assistant has bluetooth and you don’t need a bluetooth proxy, skip to – ‘HACS’ Integration into HA
Step 1 – Get the ESP32
The actual one I purchased here, recommended.
Step 2 – Connect it to your computer
I recommend using a Windows PC / Laptop and using Edge or Firefox browser for getting it set up.
It can be done on a Mac but has some complications. The software we create gets uploaded from the web browser to the ESP32, Safari browser cannot do this. It can be downloaded and transferred via terminal but we are trying to keep this simple.
Once plugged into a USB port, windows should automatically recognise it as a USB-Enhanced-SERIAL CH9102
If you buy a slightly different unit, it may have a different chip and be called something similar.
You can check this on device manager;
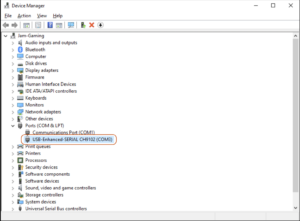
A different COM port maybe assigned but you need not worry about that if it is.
At this stage its now time to go into Home Assistant.
Step 3 – Create the Bluetooth Proxy
We need to create the firmware (operating system) that will run on our ESP32 module. To do this we are going to install an application on Home Assistant called ESPHome Device Builder to create the firmware.
Applications run along side Home Assistant and provide additional services or tools without you having to install them separately on the underlying operating system.
This application will create a basic configuration file, then build and install the underlying software to go on the ESP32 module.
Im going to do this section complete step by step as its the most daunting.
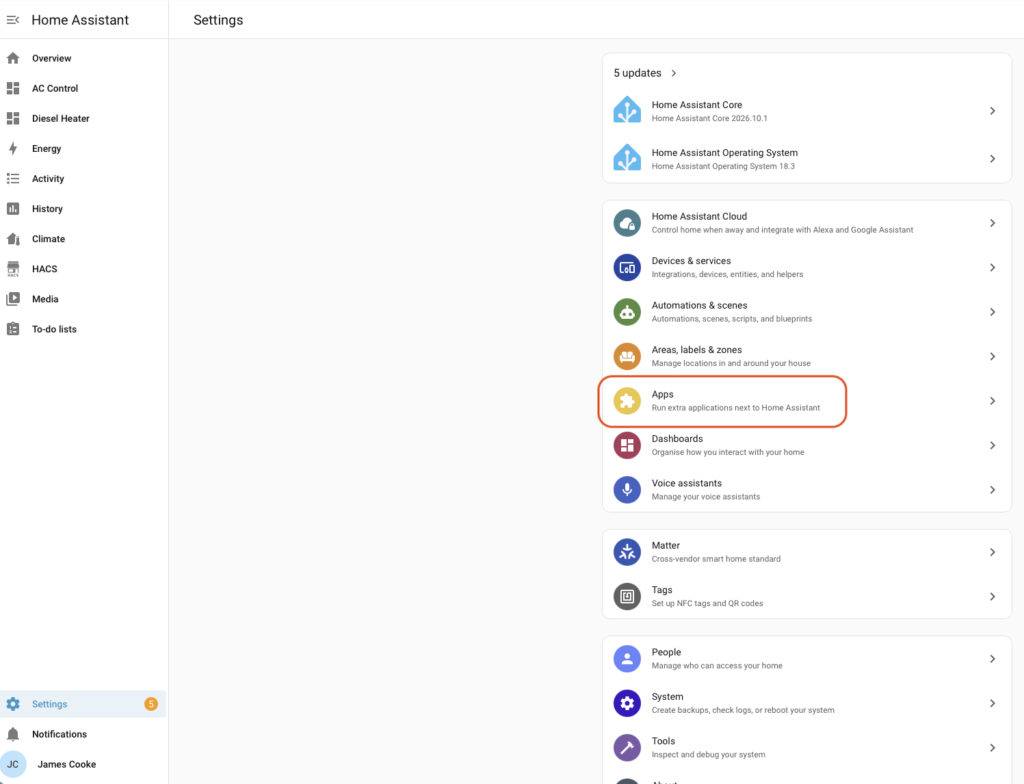
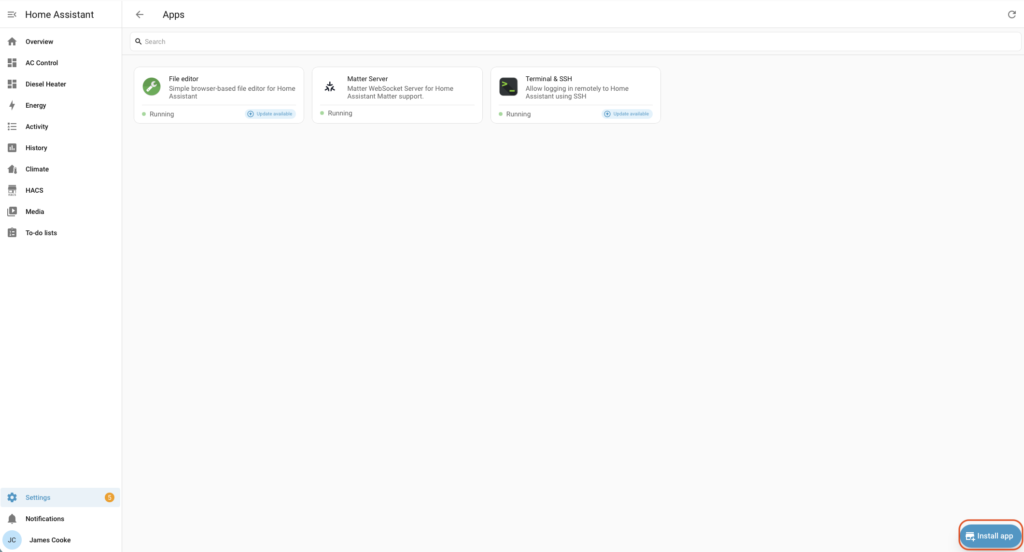
Open Home Assistant in your browser, http://homeassistant.local, head to ‘Settings’ at the bottom left corner then select ‘Apps’ then ‘Install App’ at the bottom right.
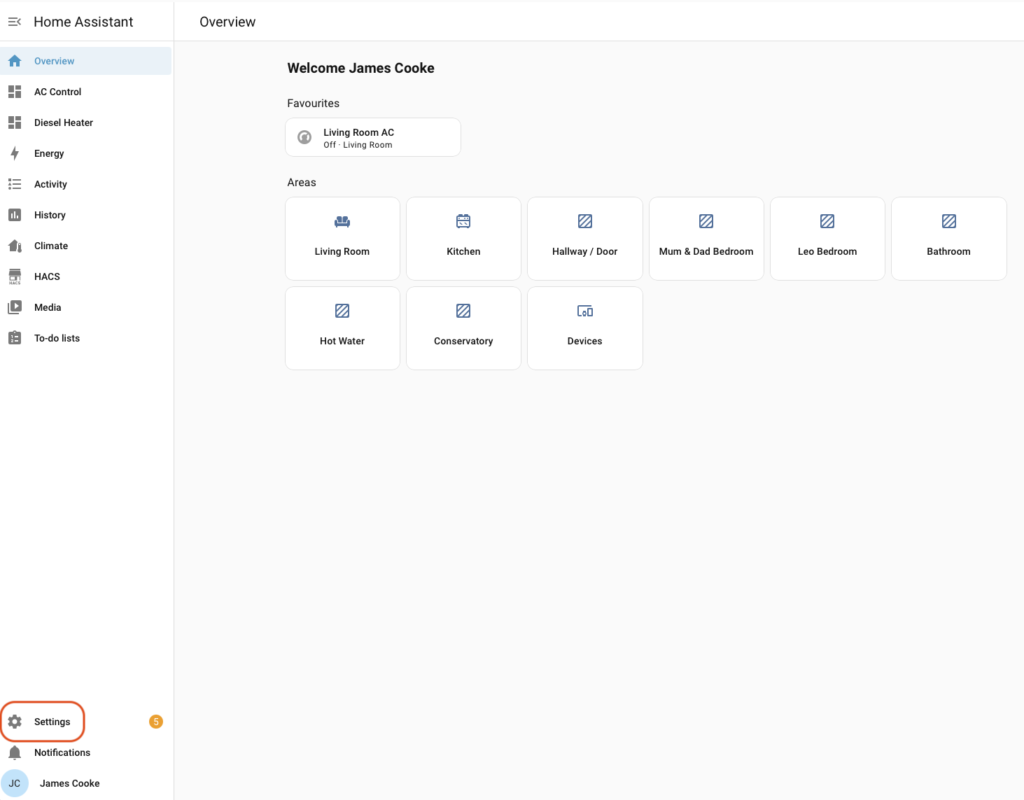
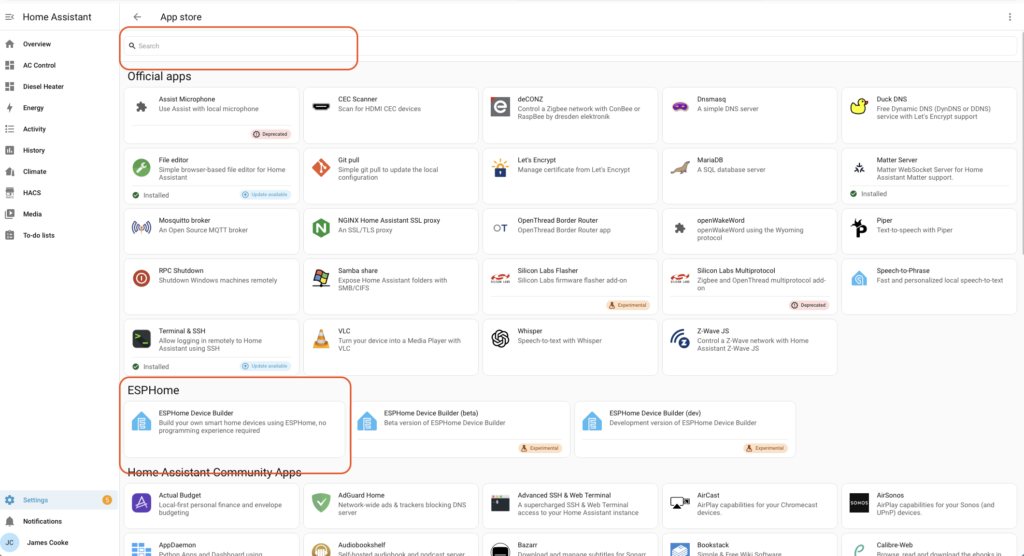
It will open this search page, search for ‘ESPHome Device Builder’. Click on it. (not dev or experimental versions!)
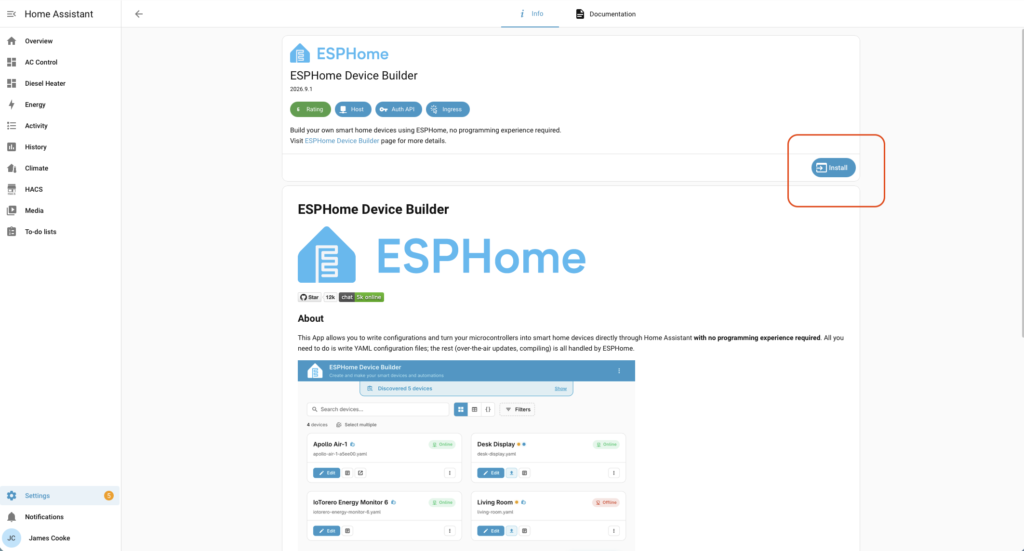
Click install;
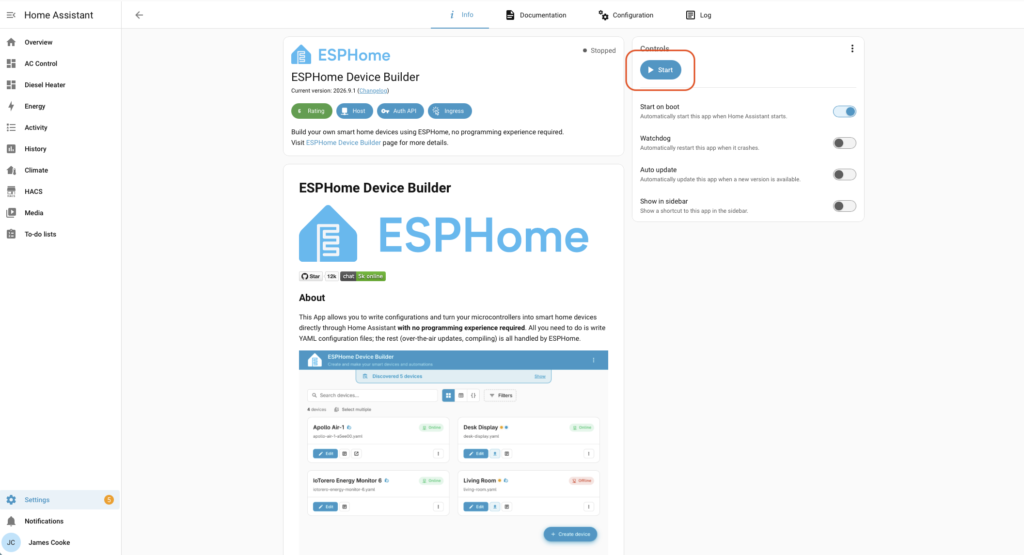
One installed we want to start the application
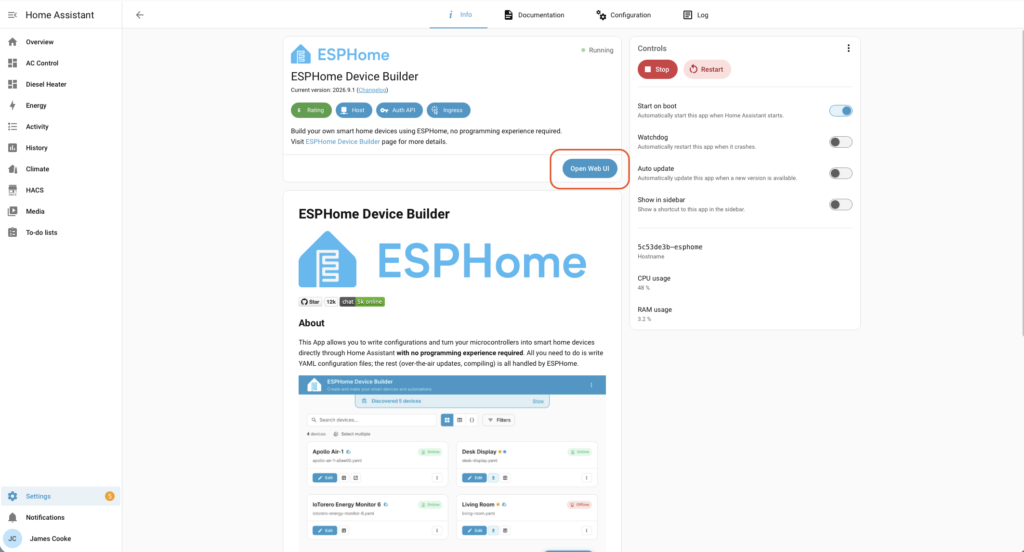
And then open the application
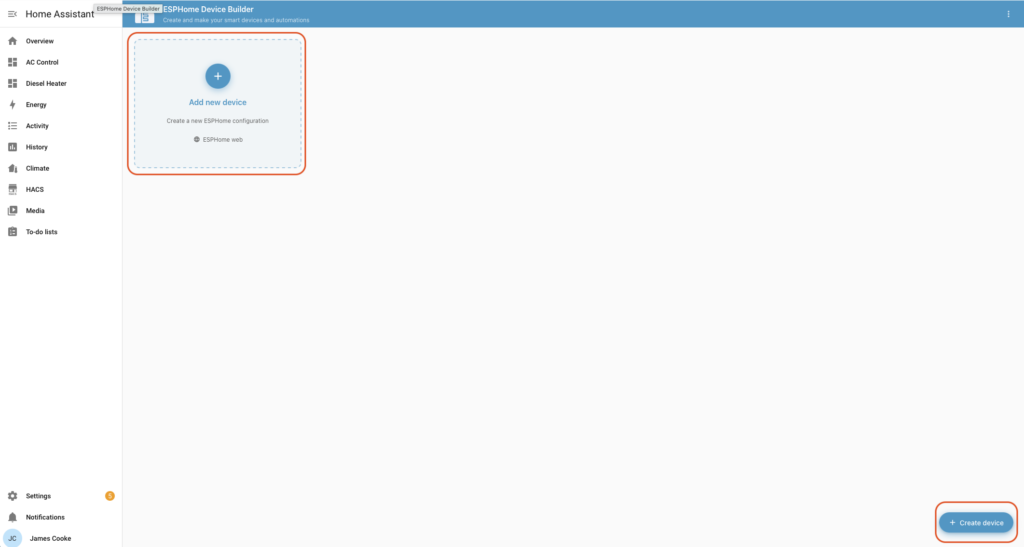
Add new device
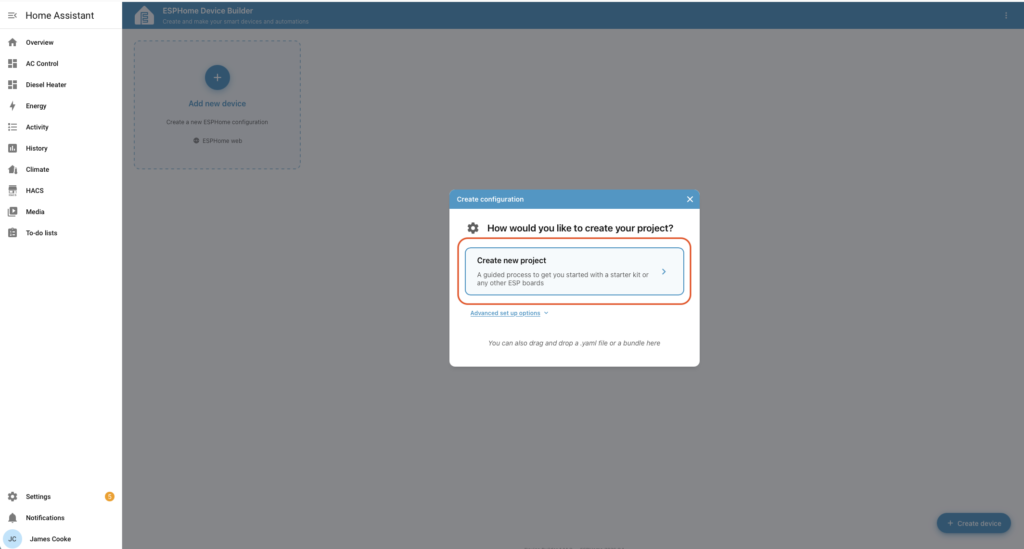
Create new project
Search ‘esp32 devkit v1’
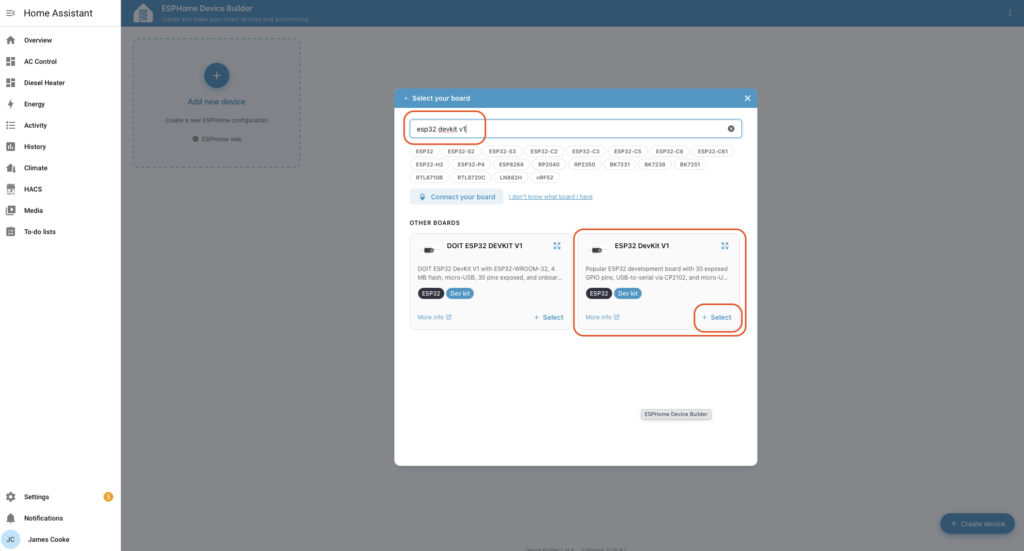
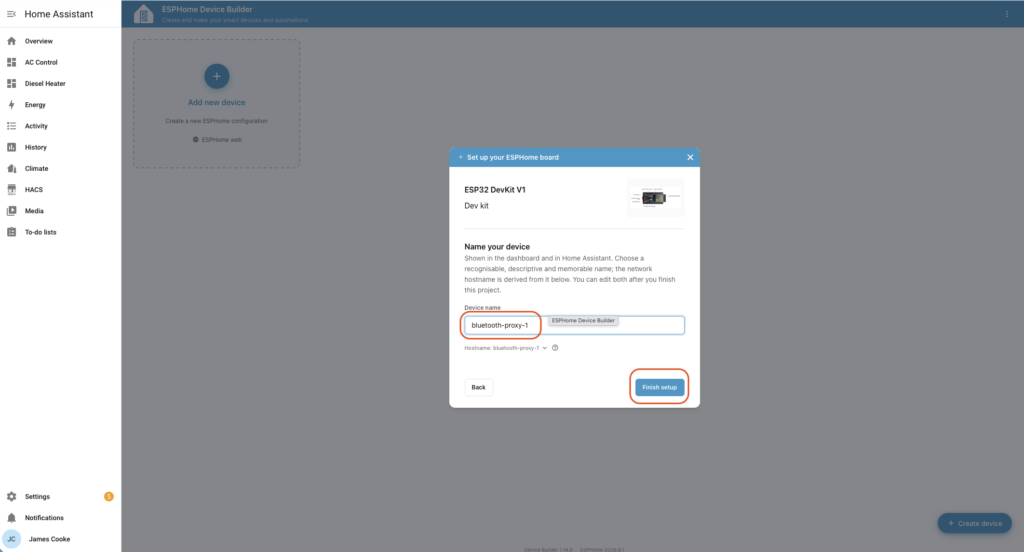
We are going to name it ‘bluetooth-proxy-1’. Then click finish setup.
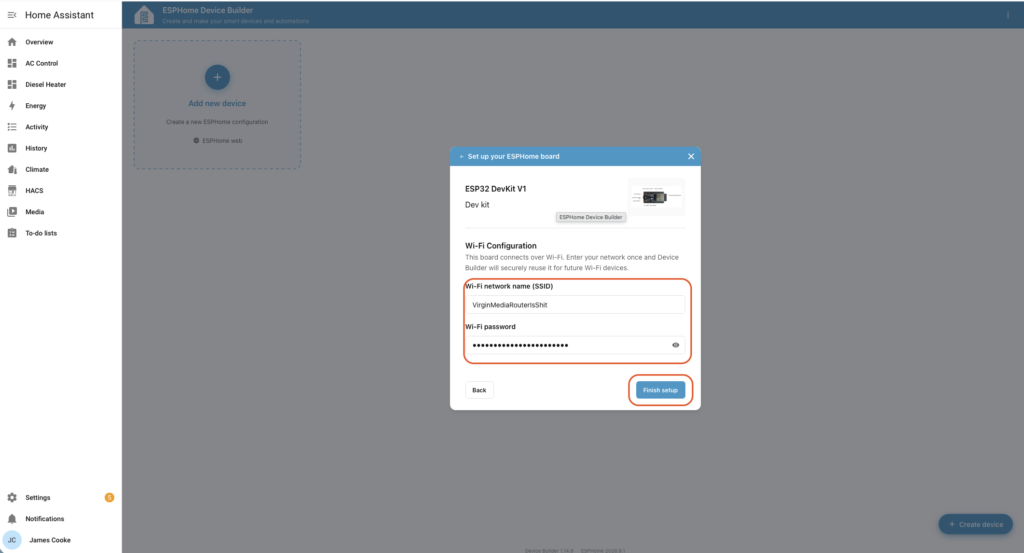
Add your wifi network credentials. Note – the ESP32 module supports 2.4Ghz wifi only – so if your router has separate 2.4 GHz and 5 GHz networks, the ESP32 needs to connect to the 2.4 GHz one. Click ‘Finish Setup’
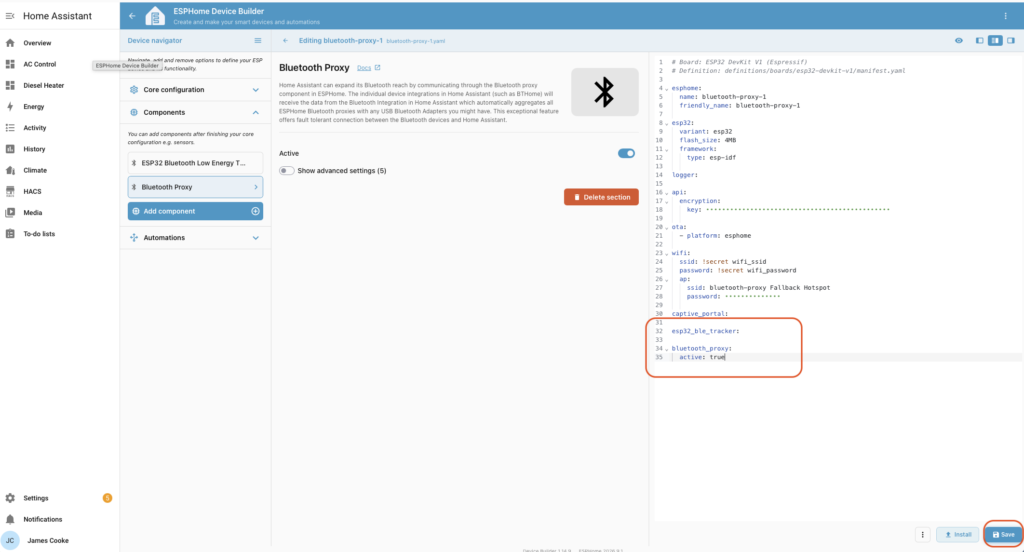
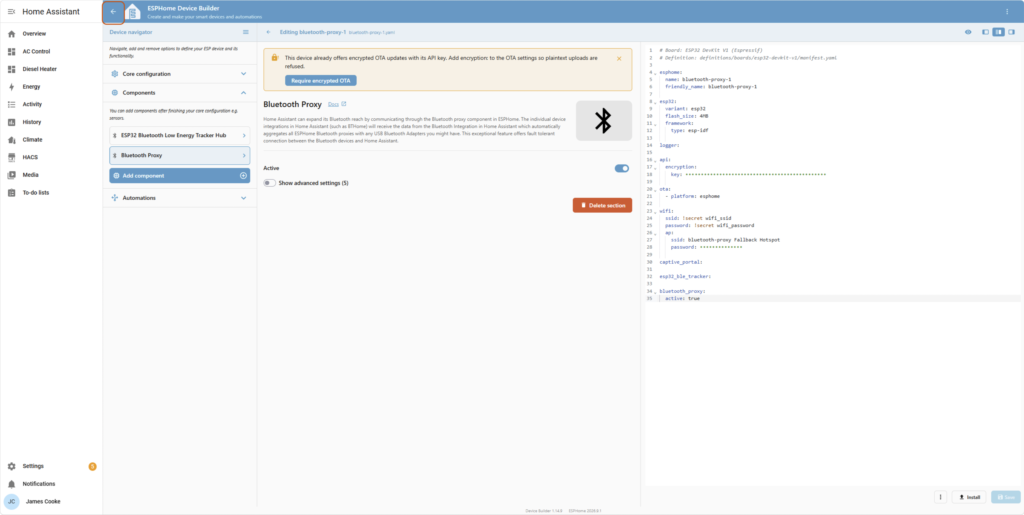
You will be presented with this, the basic initial configuration file. This tells the app that we want our ESP 32 to be called ‘bluetooth-proxy-1’, the module is an ‘esp32’ module, the wifi details are as follows.
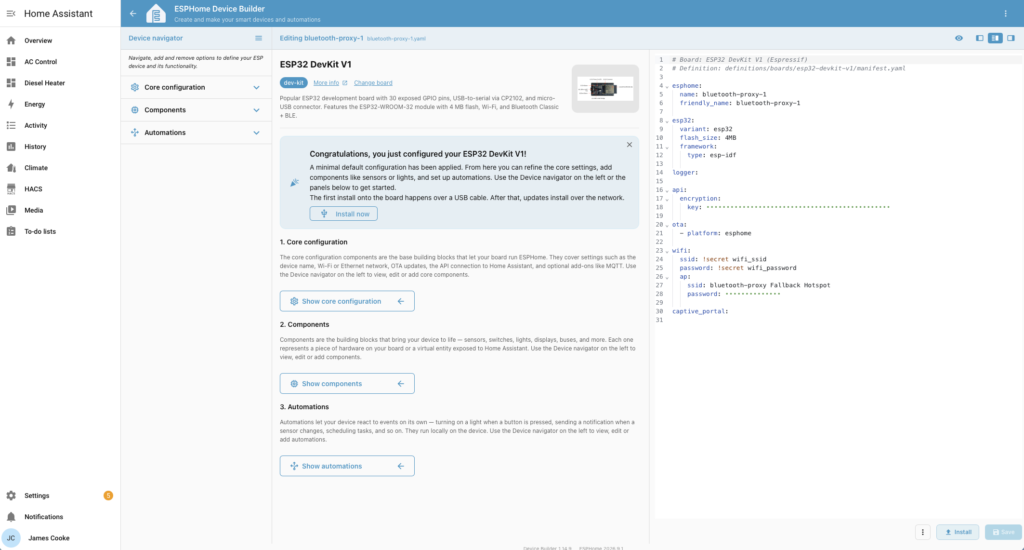
The code section on the right needs a a few lines added to it, so that the operating system builded knows that its a bluetooth proxy:
esp32_ble_tracker:

bluetooth_proxy:
  active: true
You should end with it looking like this, this click ‘Save’ then ‘Install’
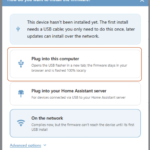
Then click ‘Plug into this computer’. You’re going to see a series of screens here. The app is taking the configuration and writing the whole operating system.
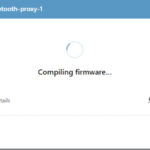
If you ‘Show Details’
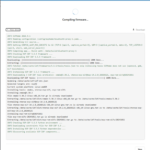
Once finished ‘Open USB Flasher’
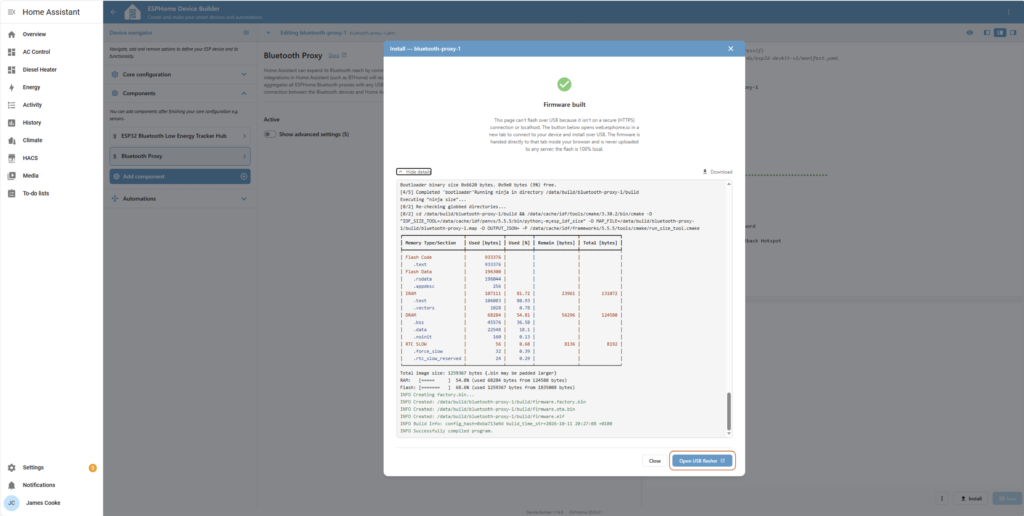
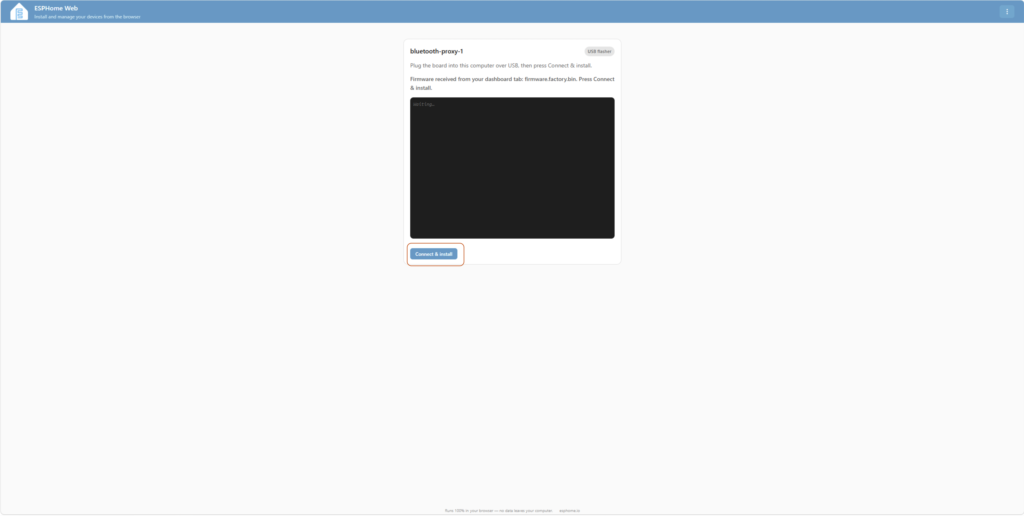
Follow the prompts to ‘Connect and Install’, Authorise connection to ‘Com3’ (or what has been assigned per Device Manager). It will now flash the operating system to the device.
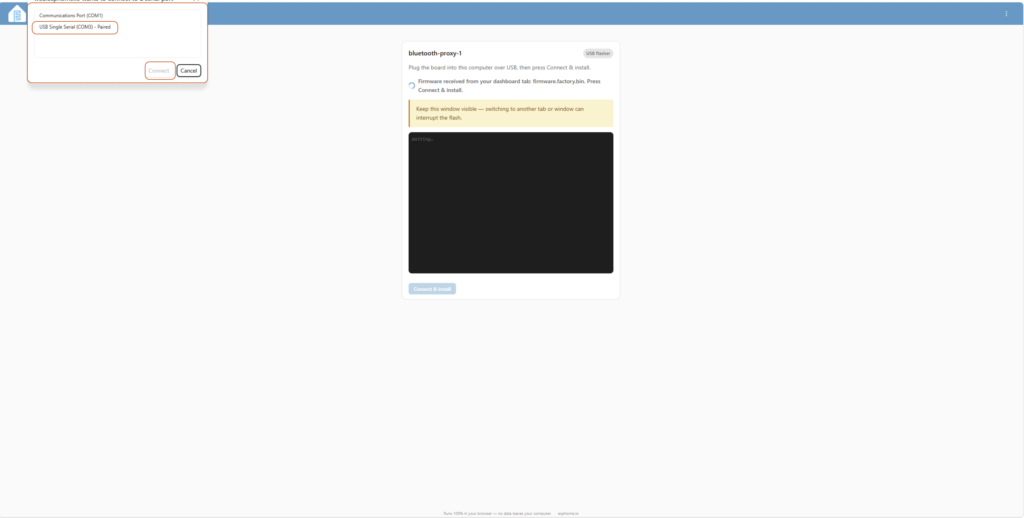
You may need to hold the ‘BOOT’ button on the device when you connect and install
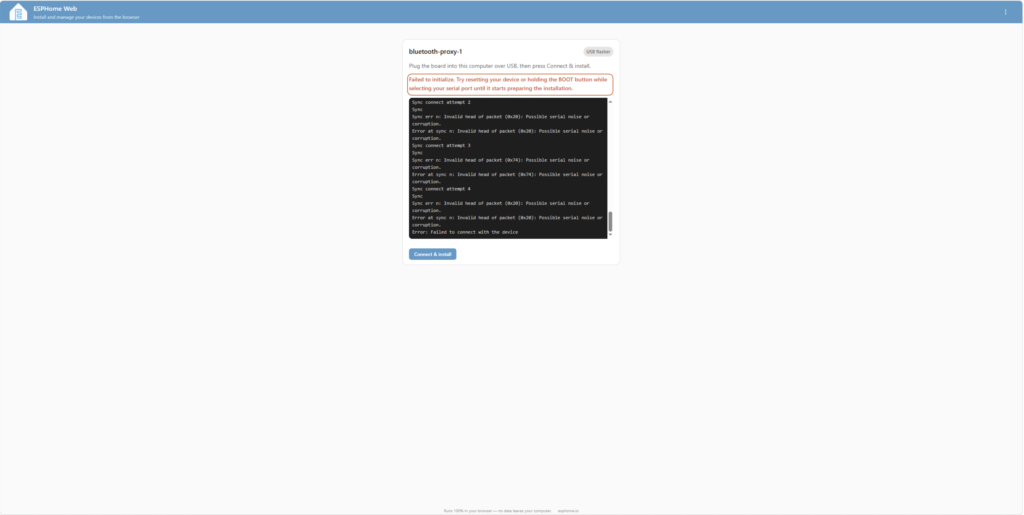
One going will say installing
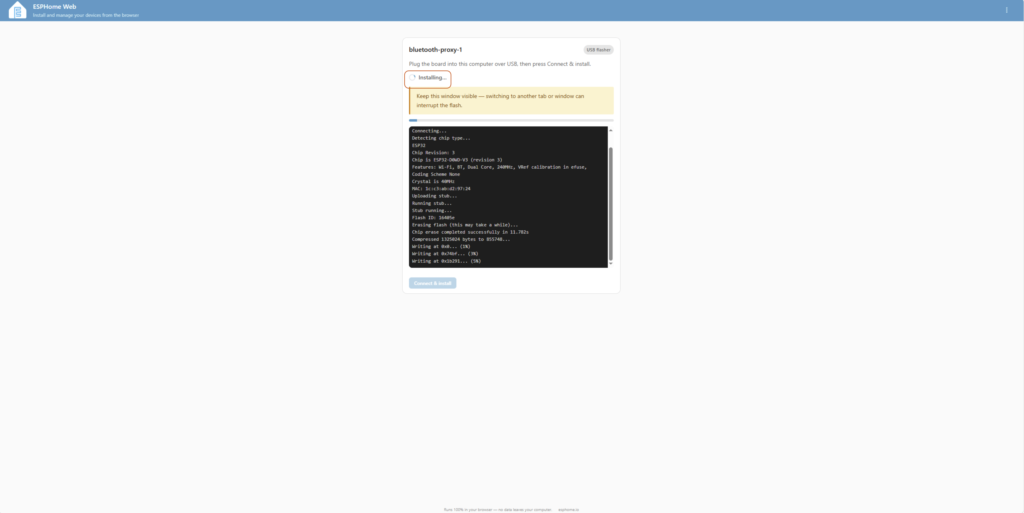
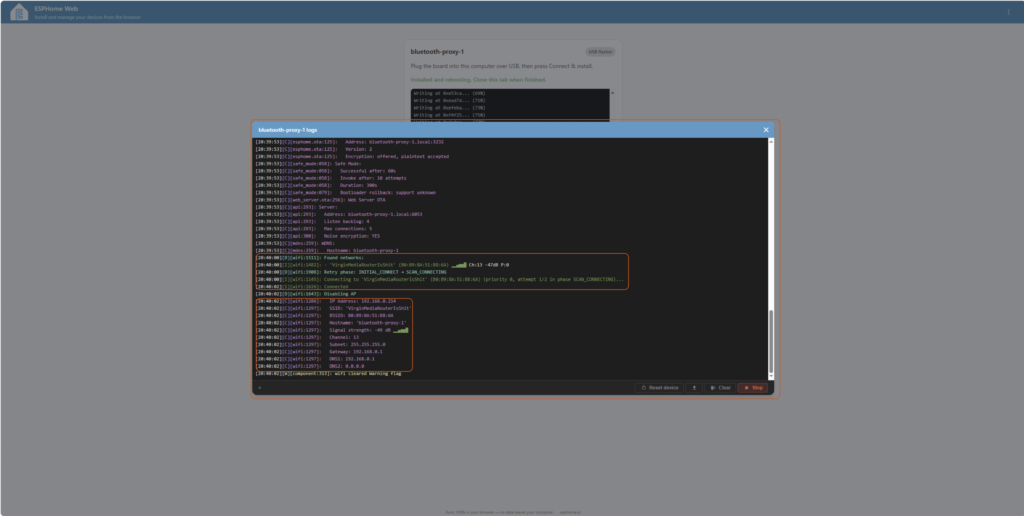
Then will finish with some logs. Check here that it says connected to your Wifi successfully. It will show the connection details. Close the box
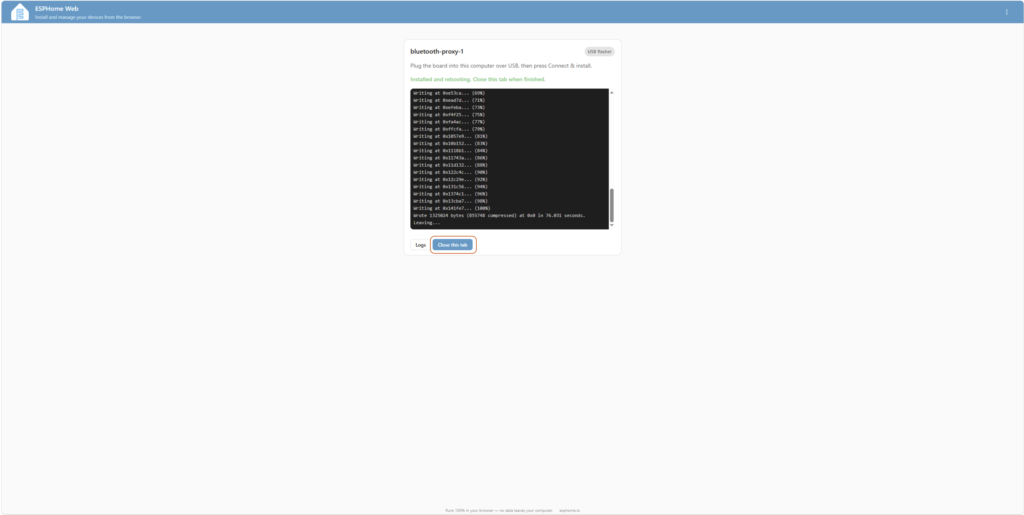
Click ‘Close this tab’
Close this block
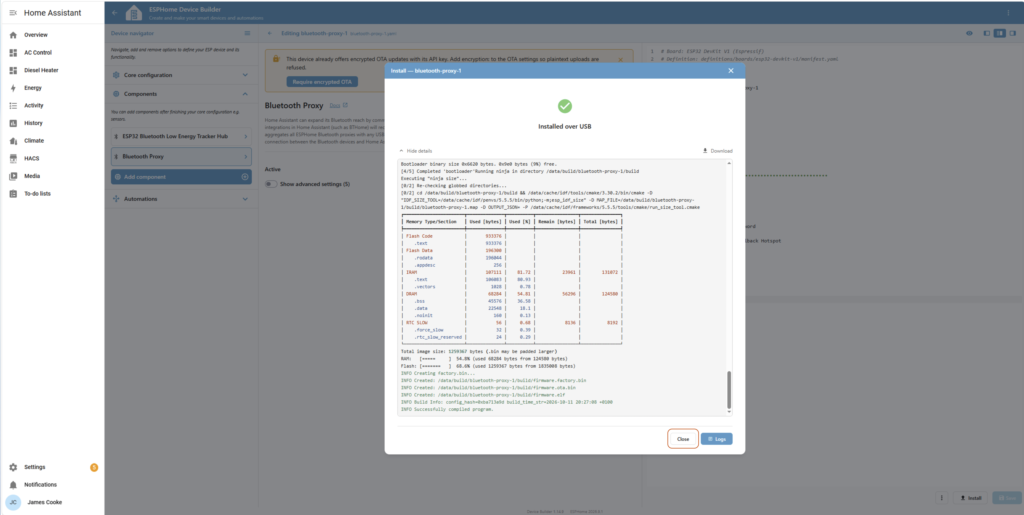
Click the back arrow
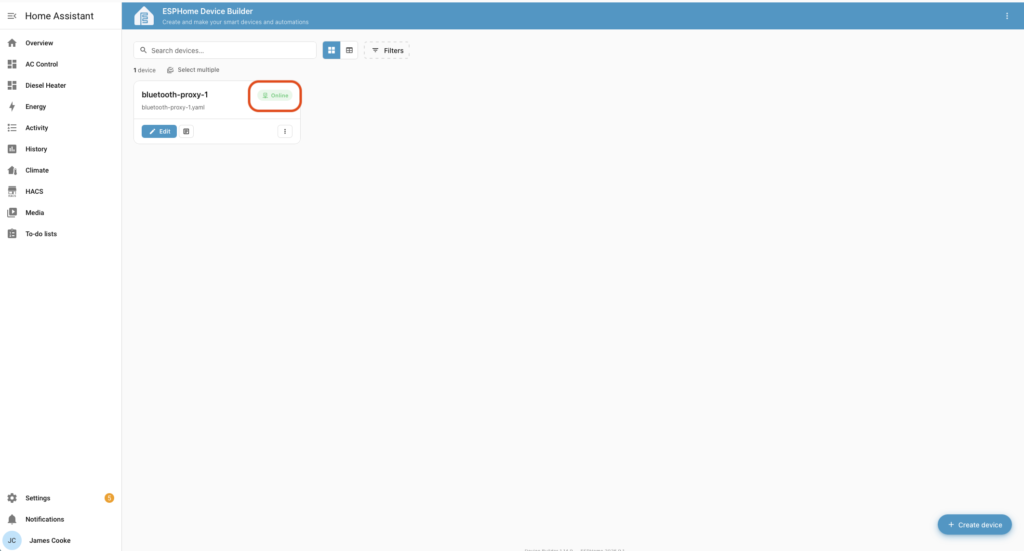
Now your device will say its online. Click on it
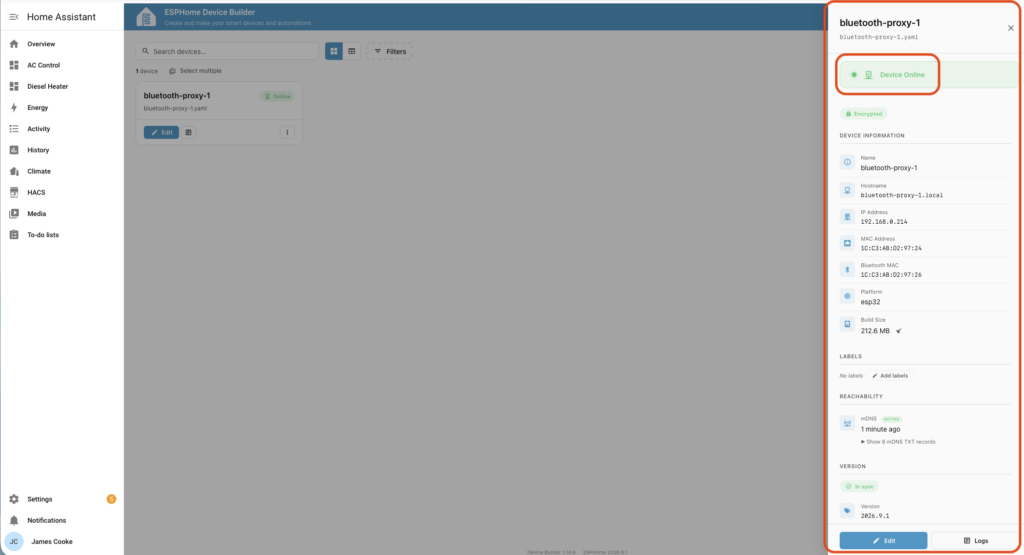
And you will get all of the details of your newly running ESP32 module.
That’s the hard part over. Now we need to get this linked up to Home Assistant
Step 4 – Add the ‘ESP32 Bluetooth Proxy’ to Home Assistant
Head to ‘Settings’, ‘Devices & Services’. Under integrations, it should have discovered the ‘module – Add ‘bluetooth-proxy-1’ module as an ESPHome Device – Add it.
If for some reason it does not, click ‘Add Integration’ in the bottom right, search for “ESPHome’ and enter the IP address shown the device builder app.
Name your device and assign it an area if you wish.
Now under Integrations you will also see that ‘Bluetooth’ is configured.
Just to check it’s working OK, head to ‘Settings’, then the newly appeared ‘Bluetooth’. Click ‘Advertisements’ and it will show any bluetooth signals that are being picked up by the unit.
In the list on mine I can spot my heater;
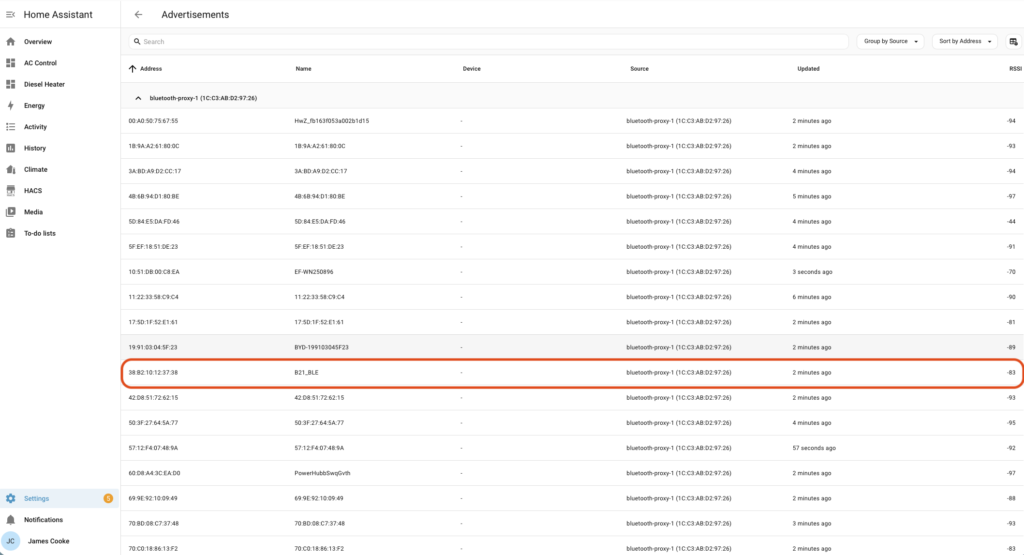
Congratulations, you have added bluetooth to Home Assistant with an ESP32 module!
Step 5 – Install ‘Diesel Heater’ Integration
From the Integrations page of Home Assistant, there are hundreds of officially supported integrations that can be installed to connect to devices in your home.
This integration is a ‘Custom’ one. A custom integration is made by the community and is not part of Home Assistant.
Custom integrations offer additional functionalities and support for devices and services to Home Assistant. These integrations are not included in the official Home Assistant releases and can be installed manually or via third-party tools like HACS (Home Assistant Community Store).
The easiest way to install this custom Intergration is to use HACS
Installing Home Assistant Community Store (HACS)
HACS an un-official Integration, we need to install it. We also need a GitHub account, as it hosted there – if you don’t have an account, create one now.
Now let’s install HACS. Head to Settings > Apps > Install app
HACS will not be in the list – we need to add a custom repository. In the top right hand corner, clink the three dots and then Respositories
In the bottom right corner, click add. Enter ‘https://github.com/hacs/addons‘. Click Add
Head back to the add ons list. Refresh the page.
There will be a section called get HACS Add-ons Repository. In it will be ‘Get HACS’. Click it and then click install. Once installed, click start.
Once installed there will be a Logs section, click that and look for anything that says install complete. It will also say to restart Home Assistant.
Head to Settings, three dots at the top right and then Restart Home Assistant.
Now we want to head back to the Integrations page. Click Add Integration. Search for HACS.
Click on it and then you will need to confirm a few safety warnings / disclaimers.
The next step is where we need the GitHub account.
A code will appear, we need to copy that code then open the link. Then we sign in if we are not already and enter / paste the code.
On the next page we confirm that we authorise HACS – then we can close the page and back to our Home Assistant where it will tell us a new device has been created. We can click skip and finish – no need to assign an area.
HACS is installed.
Now on the right hand side of Home Assistant you will see a tab for HACS.
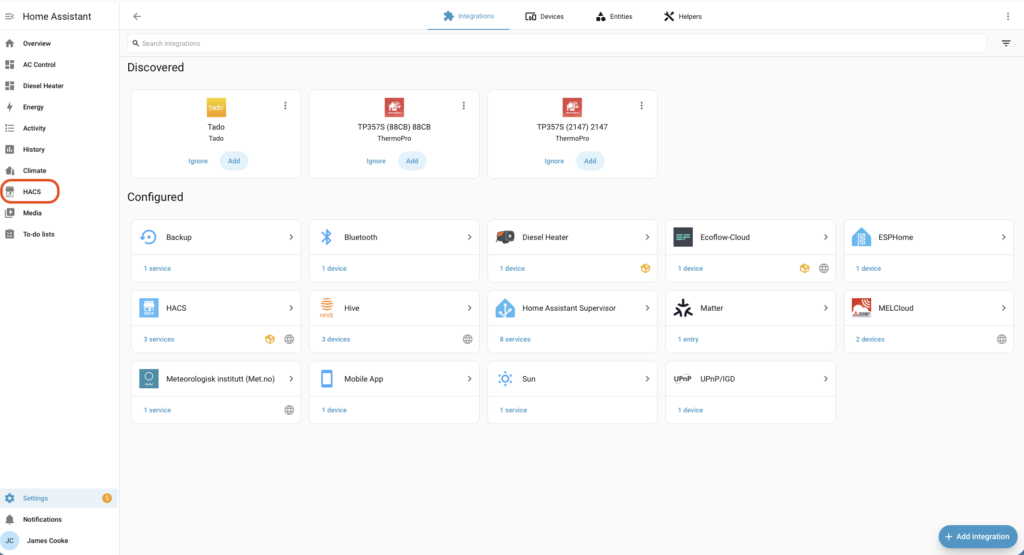
Open it and you will see a screen like below. There are hundreds of unofficial integrations that can be added from here. Choose wisely and remember they are not polished like official integrations.
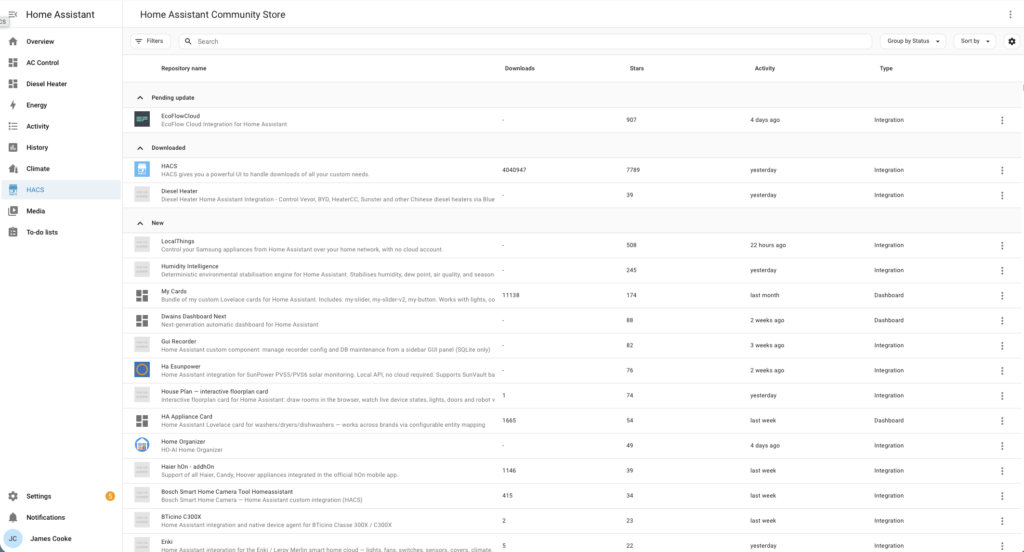
Install ‘Diesel Heater’ from HACS
To install ‘Diesel Heater’ from through HACS we will need to add custom repository as it is not in the standard HACS list.
Open HACS from the left hand side and click the three dots in the top right. Select Custom repositories.
Enter: ‘https://github.com/Spettacolo83/homeassistant-diesel-heater‘. Set the category to Integration and click Add.
Search for Diesel Heater in HACS and install it.
Important note. When you install it will ask what version you want to install. I installed the latest stable release first but run into problems when trying to add a device – I kept getting an integration error. I solved this by using 2.1.5-beta.10
Head to Settings, three dots at the top right and then Restart Home Assistant.
We are getting close now!
Step 6 – Add the Diesel Heater to Home Assistant!
If we head back to Settings then Integrations, it’s pretty likely that Home assistant will have discovered your diesel heater. My image below doesn’t show it but you see the idea.
Click add it.
Or if not, at the bottom right click Add integration.
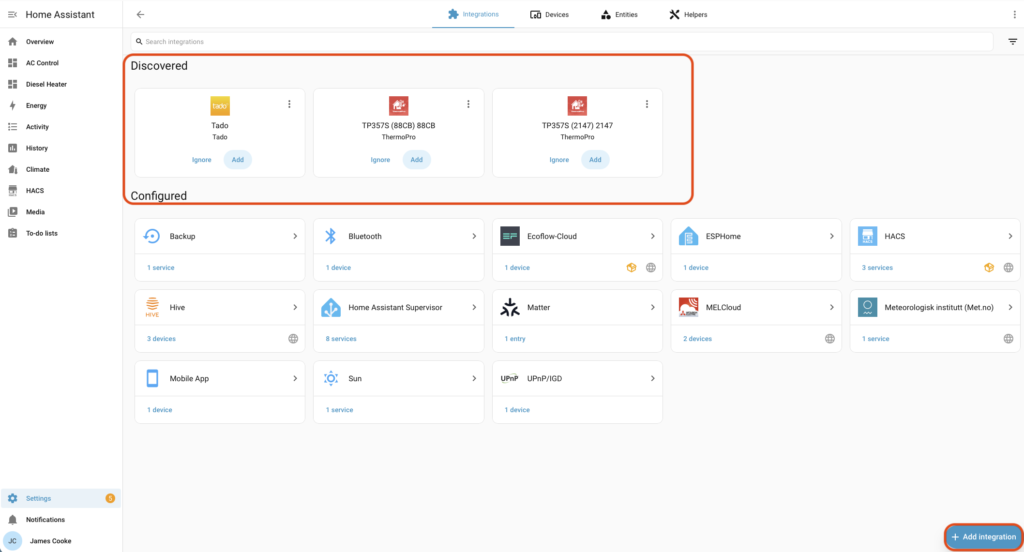
Search for Diesel Heater
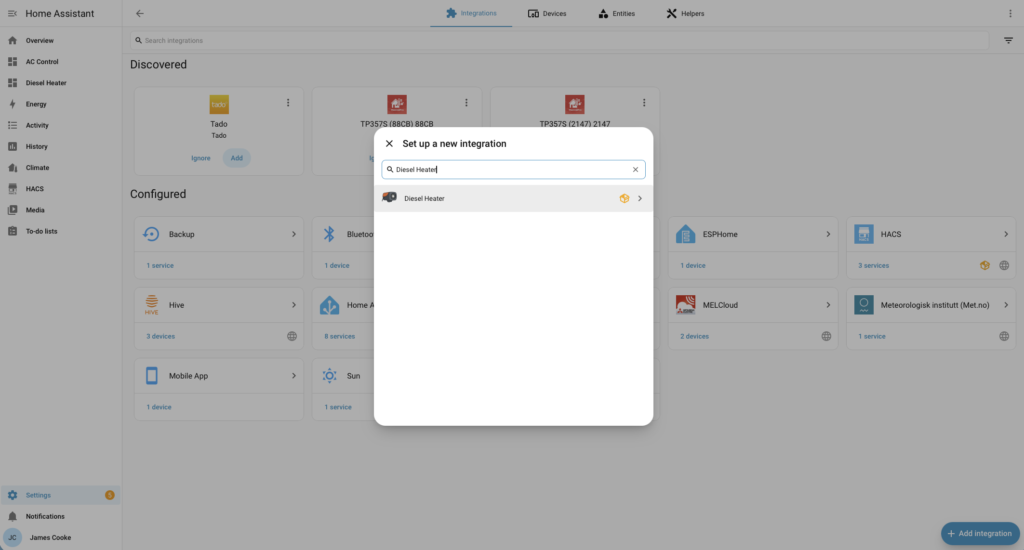
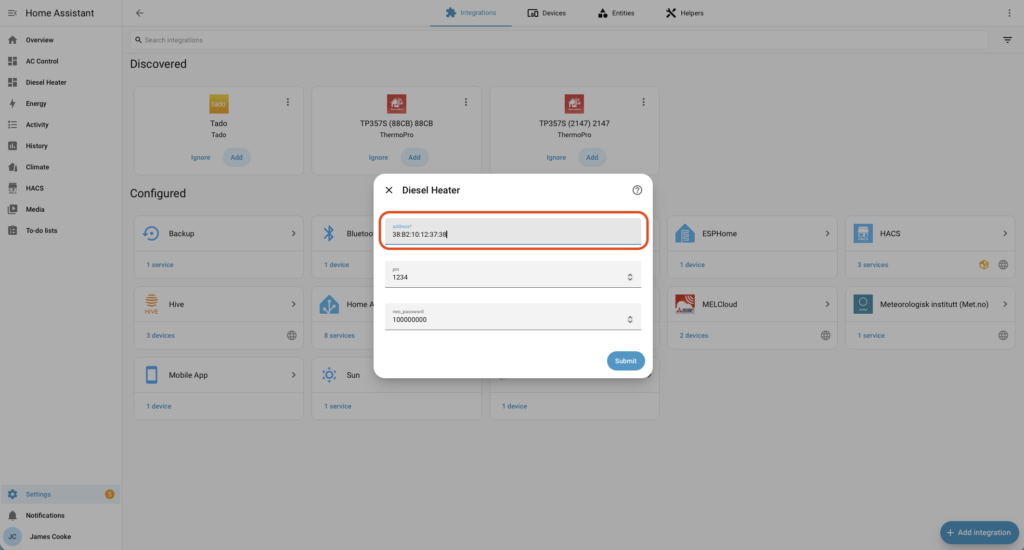
Enter the Bluetooth Address of your heater. You can find it from Settings > Bluetooth > Advertisements
The default pin and password should be OK
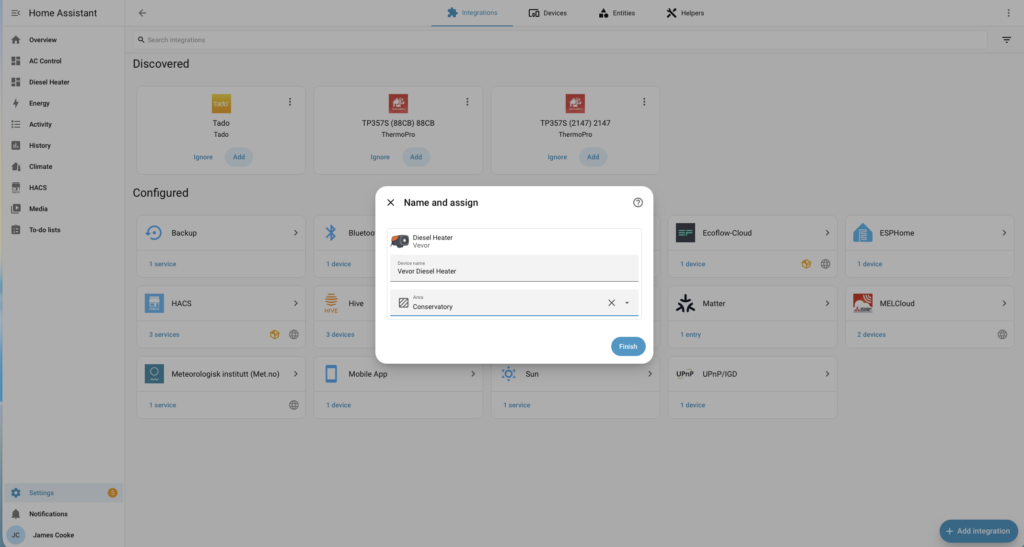
Name and assign the area. Click finish
99% of the time it will be auto Discovered anyway. Ensure your phone is not paired to it. You may also need to turn it on.
It will configure everything and then present you with all of the controls, sensors and associated information from it.
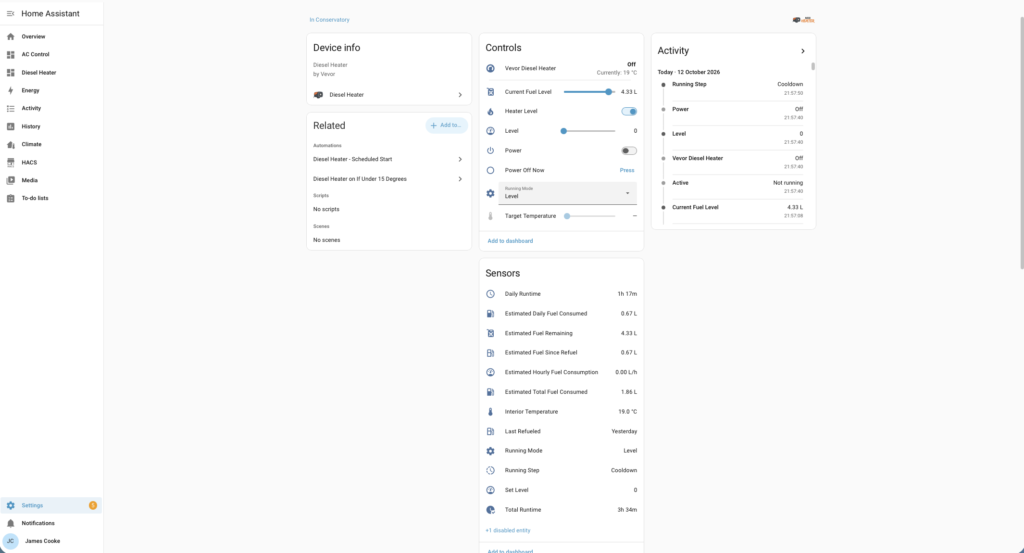
You can start controlling it from here. But we don’t want to navigate to the integrations page every time to control it.
We can make a ‘Dashboard’ so it’s accessible from the left hand menu like mine. This left menu is also easily accessible from the Home Assistant app on your phone.
For the scope of this post we are quickly going to create a simple on/off control Dashboard.
Step 7 – Create a Dashboard.
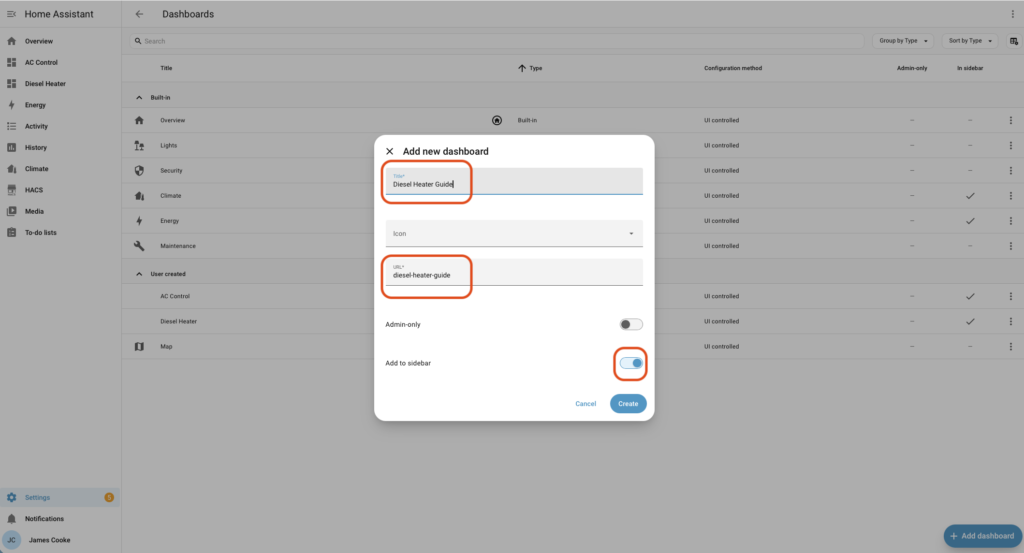
Go to settings > Dashboards > Add Dashboard. Select New Dashboard from scratch.
Enter a Title for the Dashboard – the URL will auto complete. Ensure Add to sidebar is selected.
Head back to your Dashboard, it will be blank. Click the pen in the top right corner.
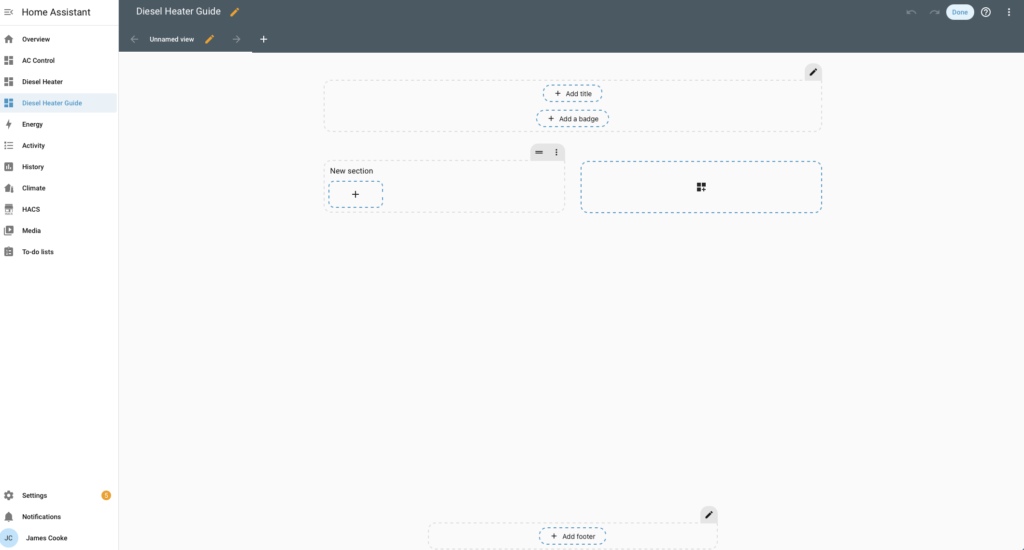
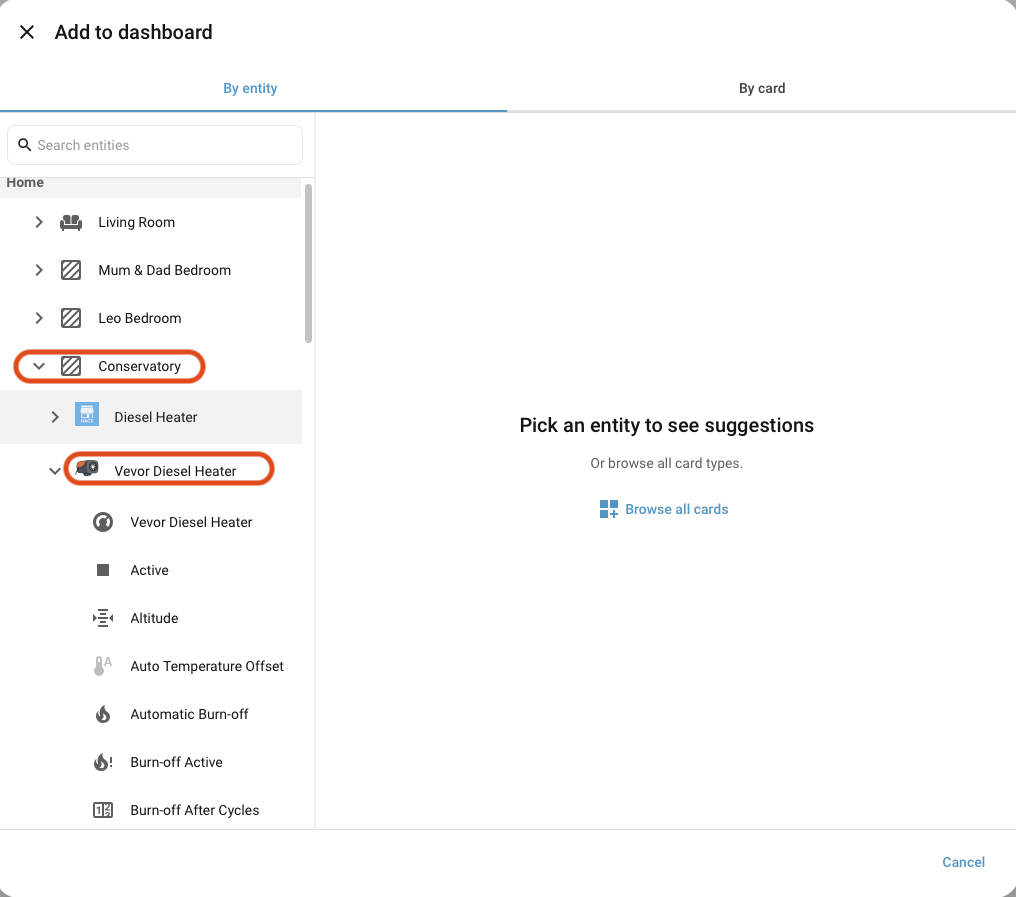
Click the + button in New section. Then navigate to the room the heater was assigned to, then the heater and find ‘Power’.
Add the Tile then also the Tile – Toggle so you can see the different type of buttons that can be made.
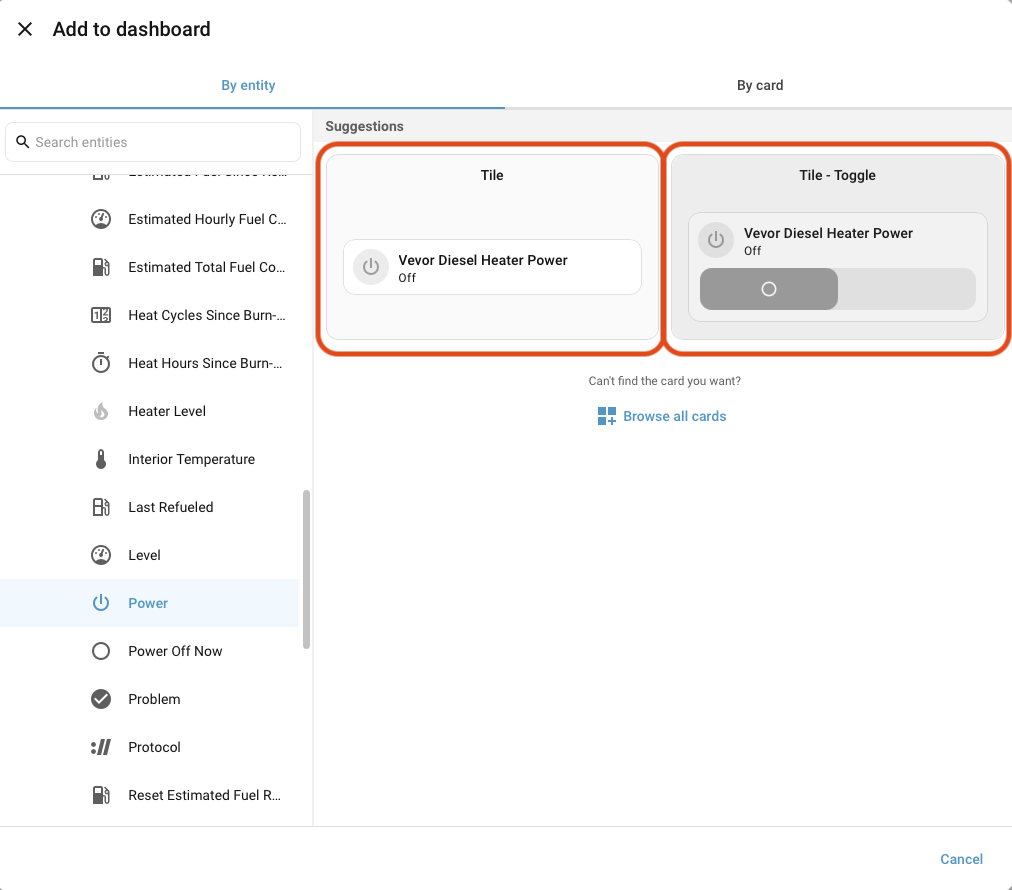
Then you will get this. Select done at the top right.
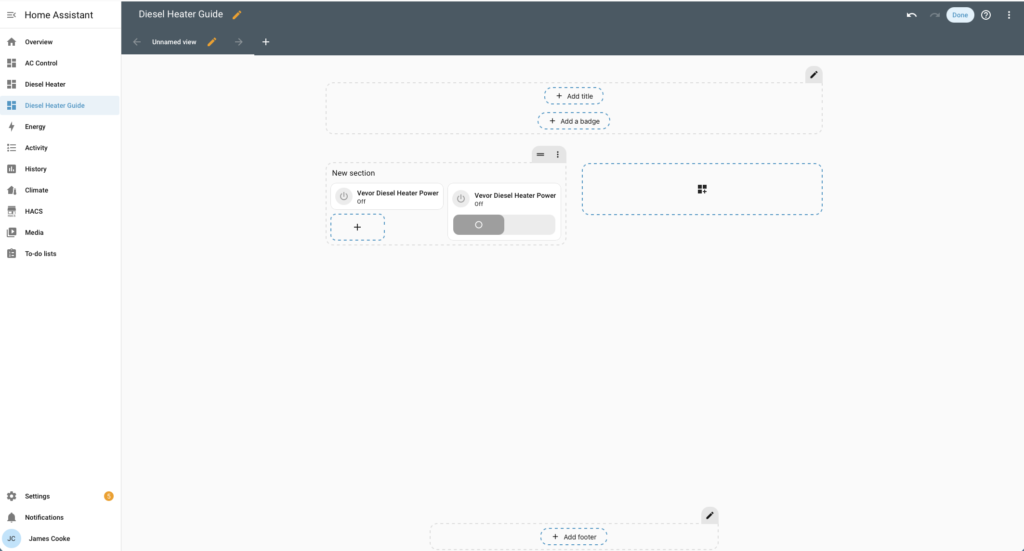
That’s it. We have the most basic control of our heater on a dashboard. You can interact with each button to get a feel and notice if you press one, the other changes as it is all dynamic.
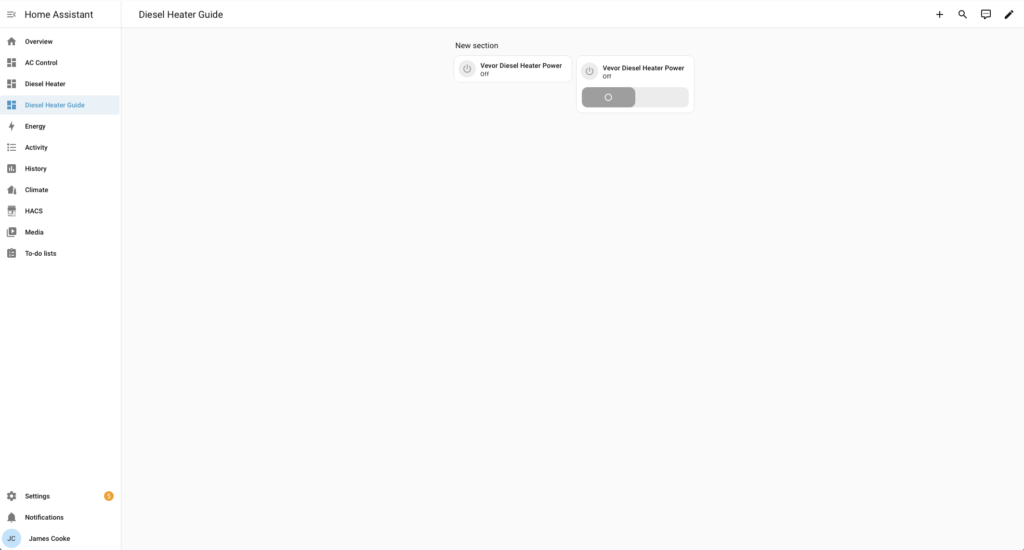
This can be customised to your hearts content. Some buttons and information you add will need the buttons editing to show something more pleasing.
With a little bit of time and effort, you can have a clean useful dashboard similar too mine;
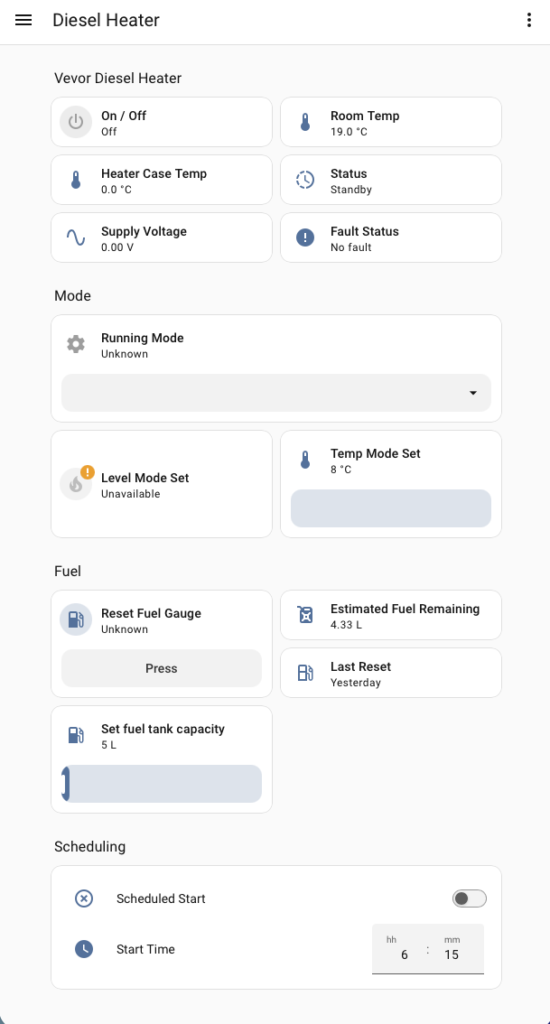
Worth noting that anything to do with fuel level is completely separate from the unit and calculated by Home Assistant. The fuel capacity needs to be set for this to estimate correctly.
Also the Scheduling in my dashboard is done via automations. Perhaps will cover that on a separate post.
Step 8 – Test it
Just click away!
Final thoughts
Was it worth doing? For me, definitely.
The original controller does the job, but it’s fairly limited. Once the heater is connected to Home Assistant, it becomes much more useful. I can control it from anywhere, set up proper schedules, monitor temperatures and faults, keep the heater’s clock in sync and build automations around how I actually use the room.
The biggest improvement for me is the control over temperature. Rather than relying on the heater’s own thermostat behaviour, Home Assistant can make the decision about when to turn the heater on and off. This gives me much more predictable heating and means I can build the heater into the rest of my home automation.
The ESP32 Bluetooth proxy also turned out to be a really useful solution. It means the heater doesn’t need to be anywhere near the device running Home Assistant, as long as the ESP32 has a reasonable Wi-Fi connection and is within Bluetooth range of the heater.
There are a couple of things worth bearing in mind though.
This isn’t an official Home Assistant integration from the heater manufacturer. The Diesel Heater integration is a community project and support depends on the protocol used by your particular heater and controller. It is therefore worth checking compatibility before buying anything specifically for this project.
Likewise, some of the information shown by Home Assistant isn’t actually being measured by the heater. Fuel level and fuel consumption, for example, are calculated by the integration, so they should be treated as estimates rather than precise measurements.
And, as I’ve found myself, things can occasionally break when Home Assistant or a custom integration is updated. If you’re relying on the heater for something important, I’d still keep the original controller installed and functional.
But if you’ve already got a compatible Chinese diesel heater and you’re running Home Assistant, adding Bluetooth control is a relatively cheap and straightforward upgrade.
For the cost of an ESP32 module, and a bit of time setting everything up, I’ve gone from a basic timer/thermostat controller to a heater that can be properly integrated into my home.
The next step for me is to make the automation a bit smarter — automatically heating the conservatory before we use it, taking outside/inside temperatures into account, and making sure the heater only runs when it actually needs to.
That’s probably a post for another day.
Oh and il find a permanent place for the ESP32 module. Probably install it into a box hidden away somewhere. Much better than just living connected to my PC for power.
Views: 6